Category: Tech Maintenance Series

Rotary Contrast Dial DCPS

This Dials for Contrast DCP is an experiment – we need your feedback after you play it through a few times.

While one idea is to stress Extended Dynamic Range and 2020 systems, another hope is that we are creating a tool that will help a  non-technical person monitor the stability or degradation of their projection system quality. It is great if you have a radiospectrometer that you can set up every week, but who has the 20 minutes to take a reading of .001 nits?

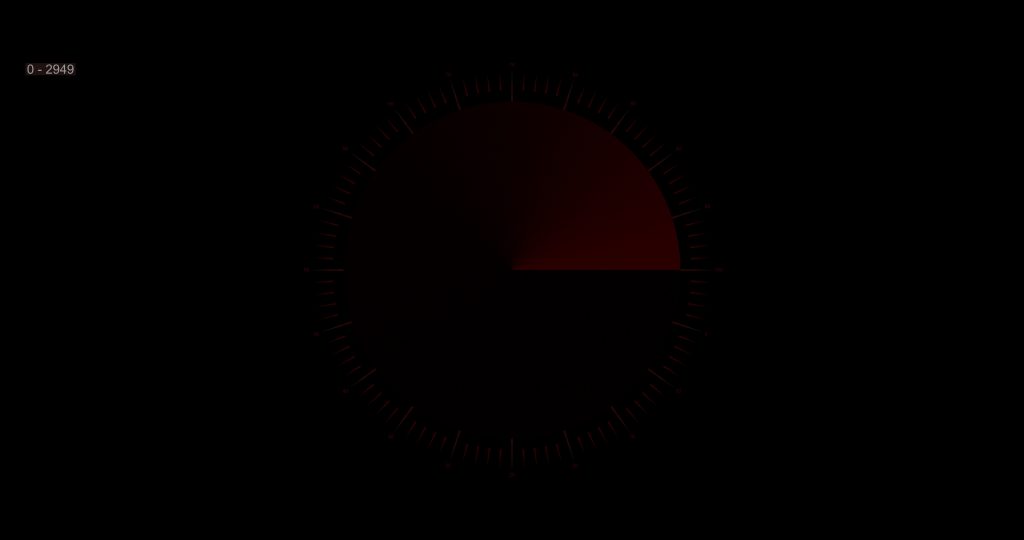
It starts at the impossible to see blue dial at 1.5% luminance and goes to 0%. If you can see any of that, you have a great system, right? After 5 seconds a set of numbers and marks appears around the outside so you can make a note of where the luminance became impossible to see.

The same thing happens 3 times for blue at 3% to 0%, then 4.5%-0% and finally 6% to 0%. The theory is that even a fumbling xenon system should be able to show some color at 6% and be useful as the bulb fades.

After Blue comes the cycle Red, then Grey, then Green.

Oh, and there is an acoustic piano test that we are working with that is thrown into the different speakers. Composed and Performed by Jeff Mikusky.  We will have a low end section and some strings soon.

We presume that for some systems the 1.5% – 0% dials will be impossible to see, and for some systems the 6% – 0% dials will be so much light that it never disappears – making the dial unusable. First Question: is there a Dial Number that works no matter the system?…which when assembled in a DCP would be a good 40 second test? …is 10 seconds enough time or too much?

Also, would some secondary colors be interesting?

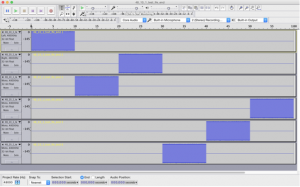
This is a new version. The previous version was created in Final Cut Pro…this one is 16bit/2020 TIFF files straight into the DCP creation tool.

Pass code: QA_b4_QC

The TIFF Files are at: Dials For Contrast TIFFs

A Dial of Red from 4.5% to 0% with tics

Trumpets~! [DCP]

We are not certain if this DCP is just pretty with 4 different views of Trumpets, or if they are usable for some unknown reason.

They are just the first of a series that tries to do for exhibition what MTF style pictures do for lenses. You can’t see from this picture, but there are red lines in there too. Therefore they are also part of the series that attempts to present slides and sounds that can be used by humans with no more tools than their vision and sound systems.

Built with 16 bit, 2020 TIFF files, that can be found here:  Trumpets~! [TIFFs]

Comments to CJFlynn at cinematesttools dot com

Passcode, as always is: QA_b4_QC

Return to Technician’s Tool Box DCPs

Trumpets, White on Black


Grey Steps, Filled with Numbers

This DCP is one minute of 4 rows of 4K Grey Boxes. Left to right, each block is 10% less than the previous. Top to bottom, each block is 2.5% less than the one above. These should actually be easy to distinguish on any well tuned digital projector.

What is unique is that within each box is 3 rows of numbers that give the percentage of White in each box. So, the top left box says “100” 3 times. Each instance of 100 is different though. The top is 65353 (16 bits of white) x 1.0(the Box Number) x .9999 [=65,528], the next is 65353 x 1.0 x .999 [=65,469] and the 3rd is 65353 x 1.0 x .99 [=64,480]. The next to the right is the same but substitute the 1.0 for .90 [=58976, 58,923, 58,392], while the one below you substitute .975 instead of 1.0 as the Box Number [=63,890, 63,833, 63,258].

The trick is to see if these numbers show up on a screen. Obviously an experiment and we would appreciate everyone telling us of their experience…with thanks to you.

The new version uploaded on 1 August 2019 exposes one column from the right, until the entire piece is exposed in order to allow people to see without the glare from the whites on the left side. …oh, and it starts with 30 secs of dark so that the eyes can take better advantage of the dark.

The passcode is QA_b4_QC

The TIFF files are at: GreyStepScales TIFFs

These are the numbers that are laid on top of the squares…can your system produce differences for some or most of them?

Numbers above grey steps x 40

Grey Steps x 40

Dials For Contrast – The TIFFs

The purpose of these TIFFs for Contrast is similar to the Vertical Meters for Contrast.

Can a person check the level of colors and contrast without a meter, then compare them to the readings of another day as they diminish or stay the same?

This one .tar file explodes into 32 TIFF files. There are 8 of each of R, G, B and Grey…one with and one without the meter tic marks of 6% – 0%, 4.5% – 0%,   3%% – 0%, and to test those million to one systems, 1.5% – 0%.

Let us know if we need to make more. Let us know if the meters are too light to be usable for the standard 2000:1 projector, or too bright on the 1,000,000:1 projectors.

Thanks~!

Oh, the Passcode, as always, is: QA_b4_QC

Return to DCP TIFFs

Go to the Dial DCP page.

A dial with tic marks to find contrast...in this case, green

CST Flat Converted to 24

Don’t look at this. It doesn’t exist. It is just an attempt to make a couple of the very cool CST test DCPs into 24 frames per second. (It is said that there are projectors – or perhaps projection software versions – which have problems when there are different rates in the same playlist.)

But they are under copyright, so this is a bad thing to have made. And they will disappear after a few days. So, go to other DCPs here.

Passcode is: QA_b4_QC

Or, go to the CST site yourself…but make certain you can play 25fps without getting into trouble:

<http://www.cst.fr/produits-et-services/mires-numeriques/>

Mires numériques

CST Scope Converted to 24

Don’t look at this. It doesn’t exist. It is just an attempt to make a couple of the very cool CST test DCPs into 24 frames per second.

…and it is not available for download now!!!! So really…don’t look. (Flat is still available.)

But they are under copyright, so this is a bad thing to have made. And they will disappear after a few days. So, go to other DCPs here.

Or, go to the CST site yourself…but make certain you can play 25fps without getting into trouble:

<http://www.cst.fr/produits-et-services/mires-numeriques/>

Mires numériques

SMPTE 2095 Pink Noise and Tones – LCR+

This DCP is 5 minutes long, with the same SMPTE 2095 and tones repeated 5 times in each of the channels, Left, Center, Right, Right Surround and Left Surround.

Sorry; not available…a new version is made and in test…email to get a sample…editor at cinematesttools you know the rest

First is 30 seconds of broadband pink noise (Highpass filter cutoff frequency 10 Hz, Lowpass filter cutoff frequency 22 kHz).
Following that is 5 seconds each of 110 Hz, 220 Hz, 440 Hz and 880 Hz, 1660 Hz and 3320 Hz.

The audio is accompanied by slides of various black and white gradient ramps against various black, white and grey backgrounds, an attempt at a Munsell chart and several variations of colored dots on an alignment grid.
As always, the passcode is QA_b4_QC

And, as always, please let us know your ideas and needs for tech DCPs.

SMPTE Pink Noise and Tones – LFE

This DCP is 2 minutes long. It repeats the same SMPTE 2095 band-limited pink noise and tones 2 times. …and only on channel 4, the traditional LFE channel.
First is 30 seconds of band limited pink noise (Highpass filter cutoff frequency 10 Hz, Lowpass filter cutoff frequency 500 Hz).
Following that is 5 seconds each of 27.5 Hz, 55 Hz, 110 Hz, 220 Hz, 440 Hz and 880 Hz.

…all at -30 dB and again, only on Channel 4, the LFE track.

Why? Just another tool. An essential use is to get a different read on the LFE that full band-width might confuse. The extra tones might let you discover that the band pass of the LFE are letting in frequencies that shouldn’t be there and are playing havoc with the screen channels and surrounds.

The audio is accompanied by slides of various black and white gradient ramps against various black, white and grey backgrounds.
As always, the passcode is QA_b4_QC

And, as always, please let us know your ideas and needs for tech DCPs

Pink and Tones – Audacity shot of the track for layout


Pink and Tones – Audacity shot of the Pink Noise frequency rolloff

What Means, New SMPTE Pink Noise…and How? – Python

SMPTE ST-2095-1 is the digital version of Pink Noise a new standard for Pink Noise. It took a great deal of work by a great number of clever people, a lot of listening and testing and tweaking. The cool thing is that it isn’t made with a lot of transiticators, but rather, with digits. This is THE Digital Pink Noise Standard.

This has been slightly edited to include the latest revised version of the python code and to be specific about using the current python3 iteration.

Passcode:
QA_b4_QC

Pink Noise has been one of those things that has always been around, and people don’t think much about it. Flick a switch, and there it is. But it took a sophisticated circuit to do right, and it wasn’t always implemented the same…or even well. That is much less likely now because with the standard is a digital formula and has been transposed as a python script that is very easy to implement.

The equipment that you rely upon may already use it. For example, the great audio tools set named Audio Tools from Studio Six Digital, has already implemented it.

But what if you just want to make some of your own? That is the point of this post – to give a few tips on how to create a usable Pink Noise .wav file using the python script that is delivered with the SMPTE Calibration Pink Noise Standard ST-2095-1…and with luck and permission, attached as a download here. [If you look inside, you can confirm that it is version 1.3]

Since the programming language ‘python’ is installed as a standard part of the Mac computer, that is what you’ll see with the drawings and instructions following. There are also some pictures of the basic use of the Audacity, the free and Open Source audio tool. Audacity is available for Windows, but the pictures are from a Mac.

So, to be clear:

1) Python and Audacity are both freely available for Windows and Linux and Mac – the current version is 3.4
2) Allowing for normal directory adjustments, the commands are the same whether used on a Mac or Windows or a Linux based computer. In Windows, of course, one uses the ‘cmd’ window instead of Terminal, and one can’t use cut and paste as one can with Terminal on the Mac and Ubuntu (pointing out only one of several usable versions of Linux OS.) [Which may have changed with recent Windows versions – I have no expertise there.]
Python Installer: <https://python.org/downloads> – The current version is 3.11

Mac Users who have downloaded the developers kit will have Python installed. If not, just download and install the official Python version.

Audacity downloads are at: <http://web.audacityteam.org/download/>

1) Download the SMPTE Standard, then create the Python File

The SMPTE Store should direct you to the IEEE Digital Library page:

ST 2095-1:2015 – SMPTE Standard – Calibration Reference Wideband Digital Pink Noise Signal

That link will take you to the Standard’s synopsis, where you can Click Purchase, which takes you to this page:

Purchase SMPTE ST 2095-1:2015 Pink Noise

Annex B of the Standard details the Pseudocode Listing for Band-Limited Pink Noise Generator. Copy and Paste that text into a text creation program (one that doesn’t add any hidden characters such as the Free and Open Source TextWrangler for Mac Users), then Save and Name your new python file as:

ST-2095-1-generator.py

Of course, since there is copyright verbiage in the .py file that says that:

# Redistribution and use in source and binary forms, with or without

# modification, are permitted provided that the following conditions

# are met:

and since we are meeting the conditions of keeping the copyright notices and other terms, you can download the file (version 1.3) here by figuring out how to download from this service.

2) Prepare the Computer

On your Mac computer, in Finder, click “Command-Shift U” to go to ‘Utilities’ folder.
Drag the .py file (from where you saved it to) into the Utilities folder; authenticate with your password when asked.
While still in Finder, click “Command-Shift O” (O as in Opal) to go to ‘Documents’ folder.
Create a new Folder (Cmd-N) and immediately type “pink_noise”, then Return to name it.
Open the ‘pink-noise’ folder with Cmd-O or double click.

3) Using the Terminal

Do “Command Spacebar”, then type “Terminal”. When the word ‘Terminal’ appears, click “Return” (or if something else is highlighted, down arrow to Terminal and click Return.) Then, presuming you have installed Python3;
In Terminal, type “python3 ” including that trailing space.
From the Utilities folder, drag the ‘ST-2095-1-generator.py’ icon to the Terminal window.
Add a space.
From the top of the previously opened ‘/Documents/pink_noise’ folder, drag the folder icon to the Terminal window.
Add a slash bar and a file name for the pink noise file to be generated: e.g., “/48_10_1.wav”
The line should look something like (depending on where you have actually put your files):

python3 /Applications/Utilities/ST-2095-1-noise-generator1_3.py Documents/pink_noise/48_10_1.wav

Hit “Return”, then wait until the script tells you how long the process took and the RMS value.

Go to ‘Documents/pink_noise folder’ to see the new .wav file. Click once, hit Space bar to listen.

4) To Modify file duration, channel numbers and bit rate

In Terminal, click up arrow which brings up the previous command.
Hit left arrow to the Capital “D” in Documents. Type “-d 20 “, or the desired length in seconds.
Note the space. Make certain there is only one space in between the ’20’ and the ‘D’.
Hit the right arrow to 2nd underscore in the .wav file name. Hit “delete” 2 times. Type “20”.
Hit “Return” to create the 20 second file.
The following command will create a .wav file that has 6, 30 second channels of 96k pink noise.

python3 /Applications/Utilities/ST-2095-1-noise-generator1_3.py -d 30 -c 6 -9 Documents/pink_noise/96_30_6.wav

The six channels in that example will play simultaneously. To create a file that will play the channels consecutively, or to change the levels or add a Fade In or Fade Out, or trim the lengths (a 10 second request will create a file longer than10 seconds), it is necessary to use an audio editing program. While many are available, the examples used below are for the well regarded, free and Open Source “Audacity” program.

NOTE: If you ask for 30 seconds, or any number actually, you will get back several seconds more. Why? It is the result of the program fulfilling all the parameters of randomness and equal noise per octave.

5) To install Audacity

Open a browser page to: http://sourceforge.net/projects/audacity/
Click the “Download” button
Double-click on the .dmg file, which will open an Audacity Install window
Drag the Audacity folder to the Applications folder.

6) To Open .wav File In Audacity

In the ‘pink_noise’ folder, Right-Click or Control-Click on the .wav file
Roll down to “Open with”. Select “Open with Audacity”
audacity_opn_with

Click “OK” to “Make a copy of the files before editing (safer)
audacity_copy_yes

You should see a single channel of pink noise that is a little shorter than 22 seconds.
audacity_one_channel

To Cut or Fade Out from 20 seconds, with the “I-bar” selected, click, hold and drag to the right.
audacity_choose_panel

To Cut:
Leaving the last 1.8 seconds selected, hit ‘Delete’.
To Fade:
Leaving the last 1.8 seconds selected, pull down from ‘Effects menu’ (at top) to ‘Fade Out’
Click Command-A to select the entire track

To quickly add channels of the same modified sound:
Click “Command-D” three times to create 8 channels while the track is selected.
Click “X” in upper left corner of any track to eliminate one track.audacity_kill_channel

Good practice, absolutely recommended since it will help save you from confusion later in the process, though not mandatory:
Always Name Your Channels – It helps later.

Name the channel by pulling down the box to the right of the ‘x’.
Note: The fourth channel will always be the LFE channel.

7) To Sequence one track after the other

Click Cmd-A to select all the tracks.
Pull down the menu “Tracks” to “Align Tracks” to “Align End to End”
‘Click Cmd-F’ and ‘Shift-Cmd-F’ to get the entire set of tracks in the window.
Slip/Adjust tracks as desired.

8) To Export to broadcast WAV file (.wav) – for use as DCP

Pull down ‘File’ to ‘Export Audio’. (Cmd-Shift-E)
Name file as desired, but definitely change the name or directory.
In ‘Format’ pull down to ‘Other uncompressed files‘.
Click ‘Options‘;Select ‘Header: WAV (Microsoft)‘; Encoding: ‘Signed 24 bit PCM’; Click ‘Save

9) To make channels Rotate…and LFE play last (See N.B. following Technique)

In Advanced Mixing Options: Click the 2nd box down on left. It will get a red outline
Click ‘Channel: 3‘ on right side. A connection will appear.
Click ‘Channel: 2‘ on right side. Connect it to 3rd box down on left side.
Click on connection bar between 3rd box on both sides to remove it.
Do the same to swap RtSurr and LftSurr for Channels 5 and 6.


If you’re looking for real fun, work with 8 channels. Drag the Output Channels out to 16, and place the Left Rear tone into Channel 11, and the Right Rear into Channel 12.

One simple way to swap channels in Audacity.
Click ‘Save’. The Next panel asks for metadata which is not supported in .wav files – so spend your time filling it in or just Click ‘OK’

NB: This technique only works if all channels have identical signals! If, for example, the LFE channel were increased by 10 dB before the Export, following the above Export example will create a Right Surround that is 10 dB too hot.

There are other techniques to make the same thing happen – and eventually (or now) you can learn. Basically, you will have to learn how to grab an audio portion of a track and move it around to the place you want it to be. This will become 2nd nature if you use the program enough, but is beyond the scope of this article.

10) Verifying the .wave file

Go to /pink_noise folder and open new file in Audacity using the “Open As…” technique described previously. If you merely double-click on the .wav file, iTunes will likely import it and play it for you.

What the .wav file will look like

This is what it should look like when complete. It will play out L, C, R, RtSurr, LftSurr, LFE
Now that the .wav file is open, filters can be applied or levels can be adjusted.

11) To add or subtract level to a channel

You might decide that you want more or less level to the surrounds or LFE tracks. This is not difficult, but you want to only increase or decrease the signal, not amplify the silence around it.

Select – carefully select – the audio portion of the track – in some circumstances you can double-click on the  then pull down ‘Effects’ to ‘Amplify’, then put in the number of dB to add (or -dB to subtract).
Do your best not to amplify the silence. But it is possible that you will not be able to avoid ‘grabbing’ a small portion of it.

You must export again to create a .wav file. When you “Save” in Audacity, you are creating an Audacity specific file set, not a playable .wav file.

But if you already have saved the .wav file so it plays channels in the proper order, then you don’t need to swap them on export again.

There is more potential in using the Audacity program, but this should serve the basic needs.

Please send document  corrections or suggestions via the Contact Form. Thanks.